Construct your verifiable credentials
Updated: October 22, 2020
Verifiable Credentials typically contain a number of key value pairs that describe attributes, or claims, about the user to which they are issued. For instance, a higher education diploma credential might contain:
name:      Alex Johnson
major:     Mechanical Engineering
date:      06/15/1998
studentId: 12515010
This article will help you define the properties and contents of your Verifiable Credentials.
Note
During the Verifiable Credentials preview, production customer data should not be used in the contents of Verifiable Credentials.
Connect to your identity provider
To receive a Verifiable Credential, users must first log in to your organization's identity provider. This allows the user to prove who they are before receiving their credential. When a user successfully logs in, your identity provider will return a security token that contains claims about the user. The issuer service then transforms these security tokens and their claims into Verifiable Credentials.
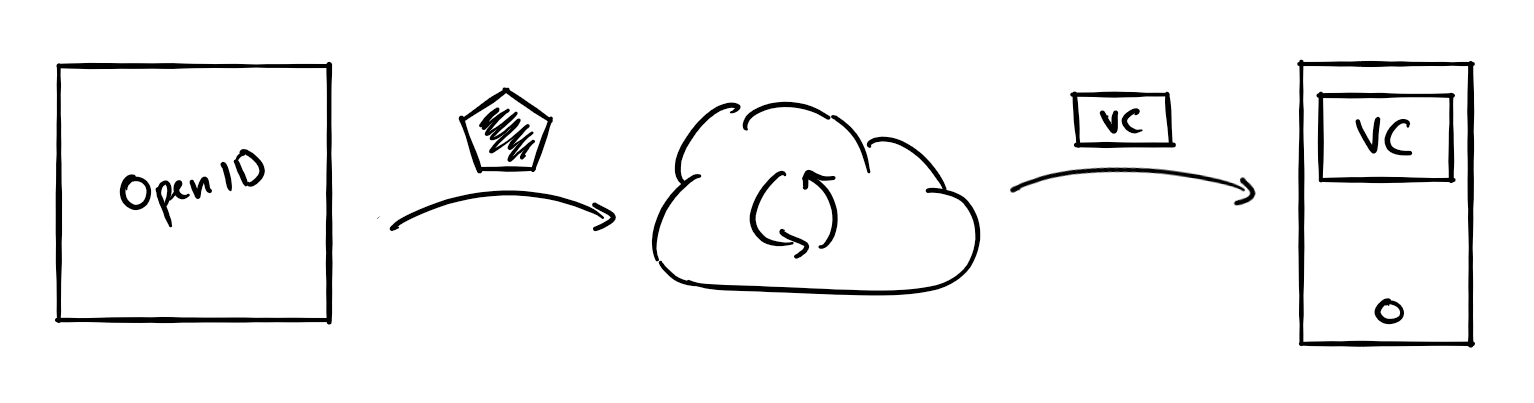
Any identity provider that supports the OpenID Connect protocol is supported. Examples of supported identity providers include Azure Active Directory, and Azure AD B2C. This article contains the details of the OpenID Connect protocol used during the credential issuing process.
To issue a Verifiable Credential, you need to provide the issuer service with the configuation details of your OpenID compliant identity provider.
| Setting | Value |
|---|---|
| Application Type | Public client/native application. |
| Application Name | "My Credential Issuer", or something similar. |
| Redirect URI | vcclient://openid |
| Service | Document Location |
|---|---|
| Azure AD | https://login.microsoftonline.com/mytenant.onmicrosoft.com/v2.0/.well-known/openid-configuration |
| Azure AD B2C | https://mytenant.b2clogin.com/mytenant.onmicrosoft.com/B2C_1_Example/v2.0/.well-known/openid-configuration |
| Service | Claim Details |
|---|---|
| Azure AD | Claims in Azure AD tokens |
| Azure AD B2C | Claims in Azure AD B2C tokens |
Once you have a client ID, you have the URL for the OpenID configuration, and you know the claims in tokens, you're ready to proceed. Any claim from your identity provider's ID token can be included as attributes in your Verifiable Credentials. To define the contents of your credential, you must create and upload a single JSON file, known as the rules file.
Create a credential rules file
The rules file is a simple JSON file that describes important properties of verifiable credentials. In particular it describes how claims from your ID tokens are used to populate your Verifiable Credentials. The rules file has the following structure.
{
  "vc": {
    "type": [ "https://schemas.contoso.edu/credentials/schemas/diploma2020" ]
  },
  "validityInterval": 2592000,
  "attestations": {
    "idTokens": [
      {
        "mapping": {
          "name": { "claim": "studentName" },
          "major": { "claim": "fieldOfStudy" },
          "date": { "claim": "graduationDate" },
          "studentId": { "claim": "studentId" }
        },
        "configuration": "https://idp.contoso.com/.well-known/openid-configuration",
        "client_id": "6809af9d-u198a0af1",
        "scopes": "openid profile email",
        "redirect_uri": "vcclient://openid"
      }
    ]
  }
}
| Property | Description |
|---|---|
vc.type |
An array of strings indicating the schema(s) that your Verifiable Credential satisfies. See the section below. |
validityInterval |
A time duration, in seconds, representing the lifetime of your Verifiable Credentials. After this time period elapses, the Verifiable Credential will no longer be valid. Omitting this value means that each Verifiable Credential will remain valid until is it explicitly revoked. |
attestations.idTokens |
An array of OpenID Connect identity providers that are supported for sourcing user information. |
...mapping |
An object that describes how claims in each ID token are mapped to attributes in the resulting Verifiable Credential. |
...mapping.{attribute-name} |
The attribute that should be populated in the resulting Verifiable Credential. |
...mapping.{attribute-name}.claim |
The claim in ID tokens whose value should be used to populate the attribute. |
...configuration |
The location of your identity provider's configuration document. This URL must adhere to the OpenID Connect standard for identity provider metadata. The configuration document must include the issuer, authorization_endpoint, token_endpoint, and jwks_uri fields. |
...client_id |
The client ID obtained during the client registration process. |
...scopes |
A space delimited list of scopes the IDP needs to be able to return the correct claims in the ID token. |
...redirect_uri |
Must always use the value portableidentity://verify. |
To issue verifiable credentials, you need to construct your own rules file. Begin with the example given above, and change the following values.
credentialIssuer value to use your Azure AD tenant ID.
vc.type value to reflect the type of your credential. See the section below.
mapping section, so that claims from your identitiy provider are mapped to attributes of your Verifiable Credential.
configuration and client_id values to the values you prepared in the section above.
Choose credential type(s)
All Verifiable Credentials must declare their "type" in their rules file. The type of a credential distinguishes your Verifiable Credentials from credentials issued by other organizations and ensures interoperability between issuers and verifiers. To indicate a credential type, you must provide one or more credential types that the credential satisfies. Each type is represented by a unique string - often a URI will be used to ensure global uniqueness. The URI does not need to be addressable; it is treated as a string.
As an example, a diploma credential issued by Contoso University might declare the following types:
| Type | Purpose |
|---|---|
https://schema.org/EducationalCredential |
Declares that diplomas issued by Contoso University contain attributes defined by schema.org's EducationaCredential object. |
https://schemas.ed.gov/universityDiploma2020 |
Declares that diplomas issued by Contoso University contain attributes defined by the United States department of education. |
https://schemas.contoso.edu/diploma2020 |
Declares that diplomas issued by Contoso University contain attributes defined by Contoso University. |
By declaring all three types, Contoso University's diplomas can be used to satisfy different requests from verifiers. A bank can request a set of EducationCredentials from a user, and the diploma can be used to satisfy the request. But the Contoso University Alumni Association can request a credential of type https://schemas.contoso.edu/diploma2020, and the diploma will also satisfy the request.
To ensure interoperability of your credentials, it's recommended that you work closely with related organizations to define credential types, schemas, and URIs for use in your industry. Many industry bodies provide guidance on the structure of official documents that can be repurposed for defining the contents of Verifiable Credentials. You should also work closely with the verifiers of your credentials to understand how they intend to request and consume your Verifiable Credentials.
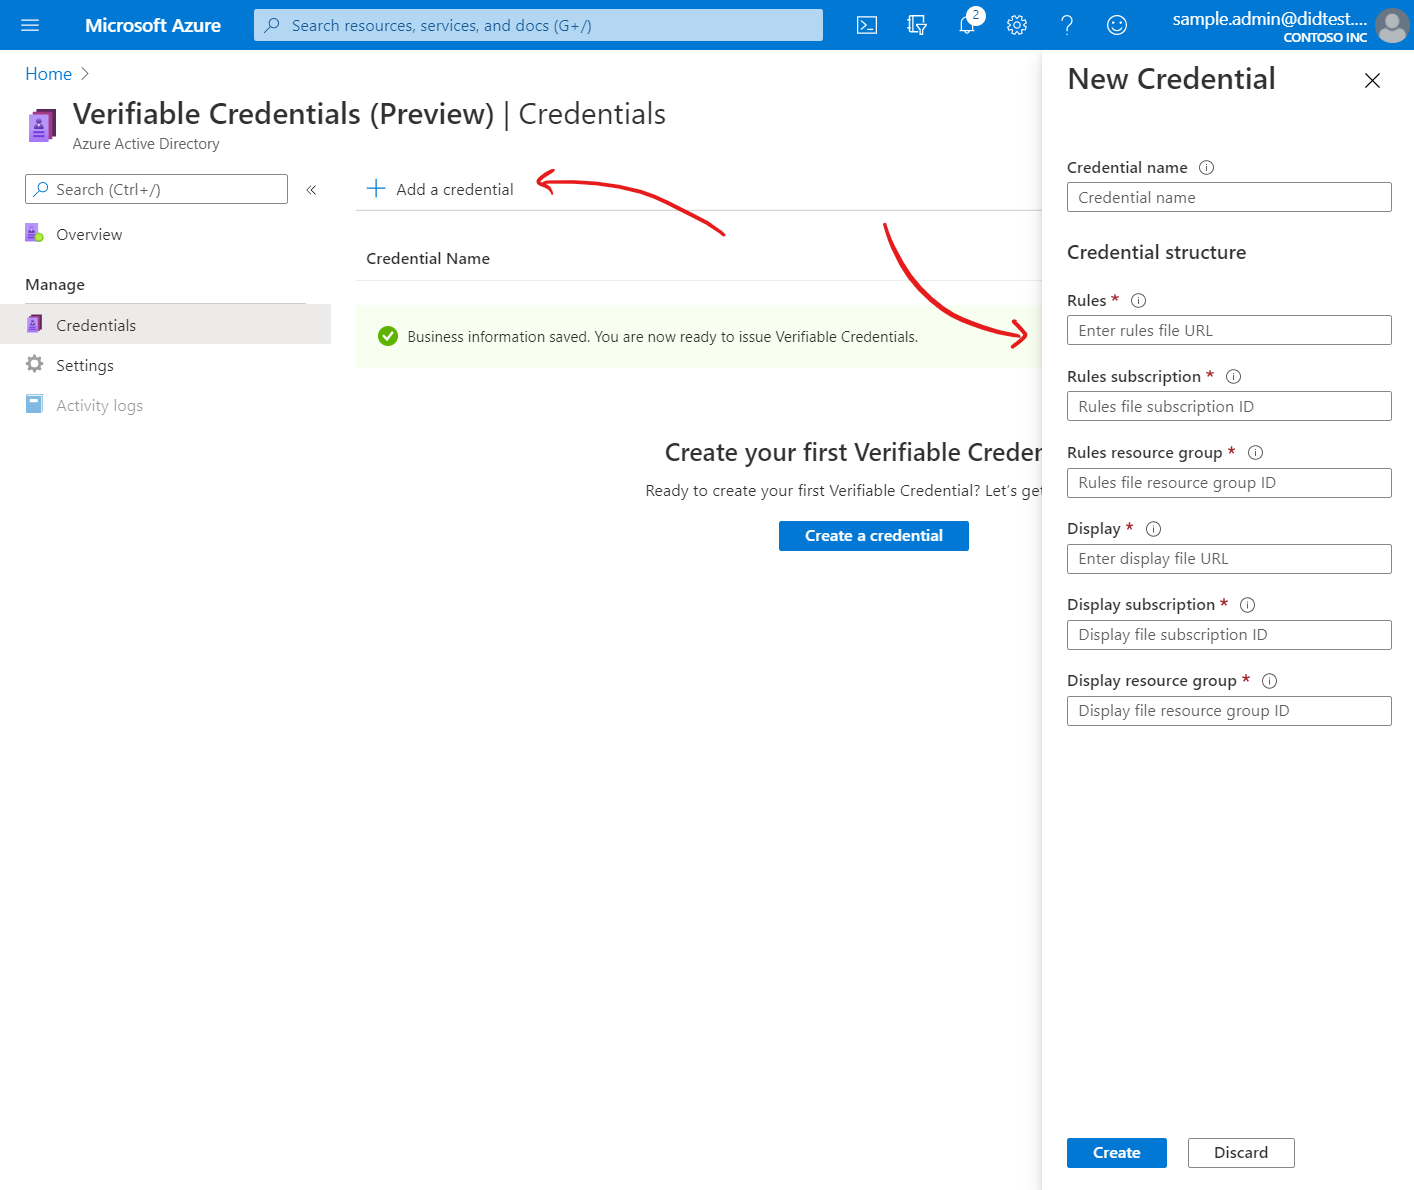
Upload the rules file
Once that you've constructed your rules file following the example above, you must upload it to your own Azure Blob Storage. The issuer service will read the rules file from blob storage when issuing credentials.
| Detail | Recommended |
|---|---|
| Region | East US |
| Performance | Standard |
| Account kind | StorageV2 |
| Detail | Recommended |
|---|---|
| Public access level | Private (no anonymous access) |
.json extension to your container. Once uploaded, copy the URL to your rules file blob from the Azure Portal. The URL should be similar to https://mystorage.blob.core.windows.net/mycontainer/MyCredentialRulesFile.json, without any spaces or special characters.
You've now successfully defined the properties and contents of your Verifiable Credential. If you'd like to reference a working example of a rules file, please see our code sample on GitHub.
Before you can finish creating your credential, you need to define the look and feel of your Verifiable Credentials. Continue onto the next article to design the appearance of your Verifiable Credentials.
See something missing? We'd love your feedback and input on the Verifiable Credentials preview. Please contact us. When you use Microsoft DID Services, you agree to the DID Preview Agreement and the Microsoft Privacy Statement.