Implementing Verifiable Credentials in your website
Updated: September 25, 2020
In the previous article, we generated a new DID using the Verifiable Credentials SDK. The cryptographic keys for the DID have been stored in Azure Key Vault, and a client ID has been obtained with access to the Key Vault.
Now we'll use the DID and the same Verifiable Credentials SDK to implement a credential exchange in a simple NodeJS website.
Using the VC SDK
The Verifiable Credentials SDK must be used in a NodeJS server. You can use the SDK to send a credential presentation request to Microsoft Authenticator by following the steps below.
As you can see the process for validating a Verifiable Credential is very similar to the process of issuing Verifiable Credentials.
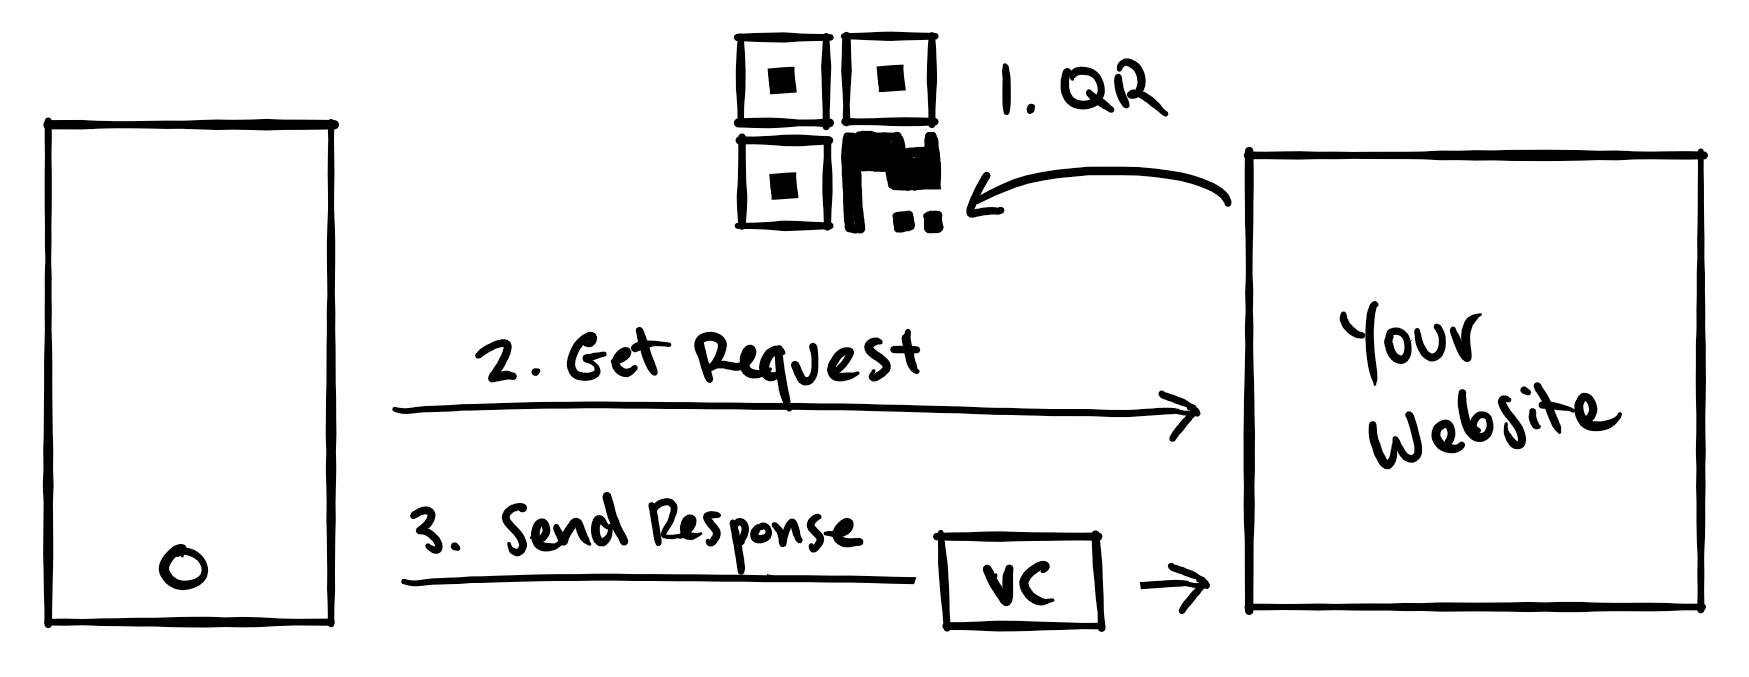
- The webpage generates the request URI and displays this as a QR code.
- When the QR code is scanned, Authenticator will send an HTTPS GET request to your server to retrieve the details of an VC request. This helps keep the size of the QR code relatively small so it can be easily scanned.
- After receiving the request, Authenticator will list all cards which match the request from the website. The user selects the correct card(s) and Authenticator sends the response with the VC(s) back to the website.
At this time the website needs to validate the received Verifiable Credentials and decides the appropiate action when everything checks out.
Display a QR Code and Deep Link
To initiate an presentation flow, you first need to display a QR code and/or a deep link on your website. On a desktop browser, the user can scan the QR code using Microsoft Authenticator to present a credential. On mobile, tapping a deep link will open Authenticator and initiate the request automatically.
openid://vc/?request_uri=https%3A%2F%2Fmyserver.com%2Fpresentation-request
| Parameter | Description |
|---|---|
request_uri |
A URL that points to your server, where an presentation request can be retrieved. The example given here is https://myserver.com/presentation-request.jwt. |
You do not need the VC SDK to construct this string. Use an open source QR code generator to convert the request into a QR code. This can be done on the server or in client side javascript in the browser.
Generate the presentation request
Authenticator will send an HTTP GET request to the provided request_uri to retrieve the presentation request. Your server needs to respond with a presentation request as a JWT.
GET /presentation-request HTTP/1.1
Host: www.myserver.com
Accept-Language: en-us
Connection: Keep-Alive

HTTP/1.1 200 OK
Content-Length: 88
Content-Type: application/jwt
Connection: Closed

eyJhbGciOiJSUzI1NiIsImtpZCI6IjFlOWdkazcifQ.ewogImlzcyI6ICJ...
To generate this response, you can use the VC SDK to construct a properly formatted presentation request. Follow the steps below to construct an presentation request in the JWT format.
var { ClientSecretCredential } = require('@azure/identity');
var { CryptoBuilder,
      RequestorBuilder,
      ValidatorBuilder,
      KeyReference
    } = require('verifiablecredentials-verification-sdk-typescript');
const kvCredentials = new ClientSecretCredential('Azure Tenant Id', 'Client ID', 'Client Secret');
const signingKeyReference = new KeyReference('verifier-signing-key', 'key');
const recoveryKeyReference = new KeyReference('verifier-recovery-key', 'key');
var crypto = new CryptoBuilder()
    .useSigningKeyReference(signingKeyReference)
    .useRecoveryKeyReference(recoveryKeyReference)
    .useKeyVault(kvCredentials, 'https://myvault.vault.azure.net/')
    .useDid(did)
    .build();
crypto object, you can create your presentation request using the RequestorBuilder API. When using this API, be sure to modify all values to reflect appropriate values for your Verifiable Credentials. In particular, be sure to modify the credentialType to the value you chose in your rules file.
const requestBuilder = new RequestorBuilder({
    clientName: "My Website",
    clientId: 'https://myserver.com/presentation-response',
    redirectUri: 'https://myserver.com/presentation-response',
    logoUri: 'https://myserver.com/images/icon.png',
    tosUri: 'https://myserver.com/terms',
    client_purpose: 'So we can check a Verifiable Credential',
    presentationDefinition: {
      input_descriptors: [{
          schema: {
              uri: ['https://schemas.contoso.edu/credentials/schemas/diploma2020'],
          }
      }]
  }
}, crypto).useNonce('al54125daf14mafdsafasd')
    .useState('bcdn31219p315n1m32adf');

var presentationRequest = await requestBuilder.build().create();
var jwt = presentationRequest.request;
| Parameter | Description |
|---|---|
crypto |
The crypto object created above. |
clientName |
A user-friendly name for your website or organization. Recommended maximum length of 40 characters. |
clientId |
The client ID of your server, whose value should be the URL where the credential should be sent. |
redirectUri |
The URL where the credential should be sent. Should be the same as client_id. |
logoUri |
A URL to a logo representing your website or organization. |
tosUri |
A URL to a the terms of service for your Verifiable Credentials. |
client_purpose |
A user-friendly string you can use to describe the reason for sending the user an presentation request. |
...schema.uri |
The schema or type of your Verifiable Credential that your website requires. This can be an array if you require multiple credentials. |
.useNonce(...) |
Provide a randomized string that will be returned in the Verifiable Credential response. |
.useState(...) |
Allows you to provide a string whose value will be returned to your server along with the Verifiable Credential response. |
Validate the presentation response
Once the user has chosen the correct Verifiable Credentials and accepts these in the Authenticator application, the Authenticator sends the response message, signed with the users private key, to your server's redirect_uri as a HTTP POST request.
POST /presentation-response HTTP/1.1
Host: www.myserver.com
Content-Type: application/x-www-form-urlencoded
Content-Length: 315
Accept-Language: en-us
Accept-Encoding: gzip, deflate
Connection: Keep-Alive

state=amfn31219p315n1m32adf&id_token=eyJhbGciOiJSUzI1NiIsImtpZCI6IjFlOWdk6ICJ...
To verify this response, and optionally, extract the contents of the Verifiable Credential, you can use the VC SDK. Follow the steps below to validate an presentation response an access the contents of the presented credential.
var { ValidatorBuilder } = require('verifiablecredentials-verification-sdk-typescript');
// Provide the expected DID of the credential issuer.
const issuerDid = 'did:ion:EiARML0CG8vUJHoKPBIVU-PiP4d2umBpzJD-yB9nOavQgA?-ion-initial-state=eyJkZWx0YV9oYXNoIj...';
id_token body parameter to the validator.validate(...) function.
// Provide the expected client ID value used in the request above
const clientId = 'https://myserver.com/presentation-response'

// Validate the credential presentation and extract the credential's attributes.
// If this check succeeds, the user is a Verified Credential Ninja.
// Log a message to the console indicating successful verification of the credential.
const validator = new ValidatorBuilder(crypto)
  .useTrustedIssuersForVerifiableCredentials({['https://schemas.contoso.edu/credentials/schemas/diploma2020']: [issuerDid]})
  .useAudienceUrl(clientId)
  .build();

const validationResult = await validator.validate(id_token);

if (!validationResult.result) {
    console.error(`Validation failed: ${validationResult.detailedError}`);
    return res.send()
}

// The presentedCredential object will contain all properties of the verifiable credential.
var presentedCredential = validationResult.validationResult.verifiableCredentials['https://schemas.contoso.edu/credentials/schemas/diploma2020'];
Once you've implemented the steps above, you're ready to present yourself a Verifiable Credential. You are now well on your way to building a more trustworthy internet. Continue onto the next article to use Microsoft Authenticator to present your Verifiable Credential.
See something missing? We'd love your feedback and input on the Verifiable Credentials preview. Please contact us. When you use Microsoft DID Services, you agree to the DID Preview Agreement and the Microsoft Privacy Statement.