Building an issuer website
Updated: September 25, 2020
This article describes how to get your NodeJS app or website configured to issue Verifiable Credentials VC using a verifiable credentials NPM package. A code sample is also available on GitHub for your reference.
Setup access to Azure Key Vault
To authenticate a credential issuance request to the user, the issuer website will use your crytographic keys in Azure Key Vault. To access Azure Key Vault, your website will need a client ID and client secret that can be used to authenticate to Azure Key Vault.
| Detail | Recommended |
|---|---|
| Supported account types | This organization only. |
| Client Secret | Create a new client secret in the Certificates & Secrets configuration section. |

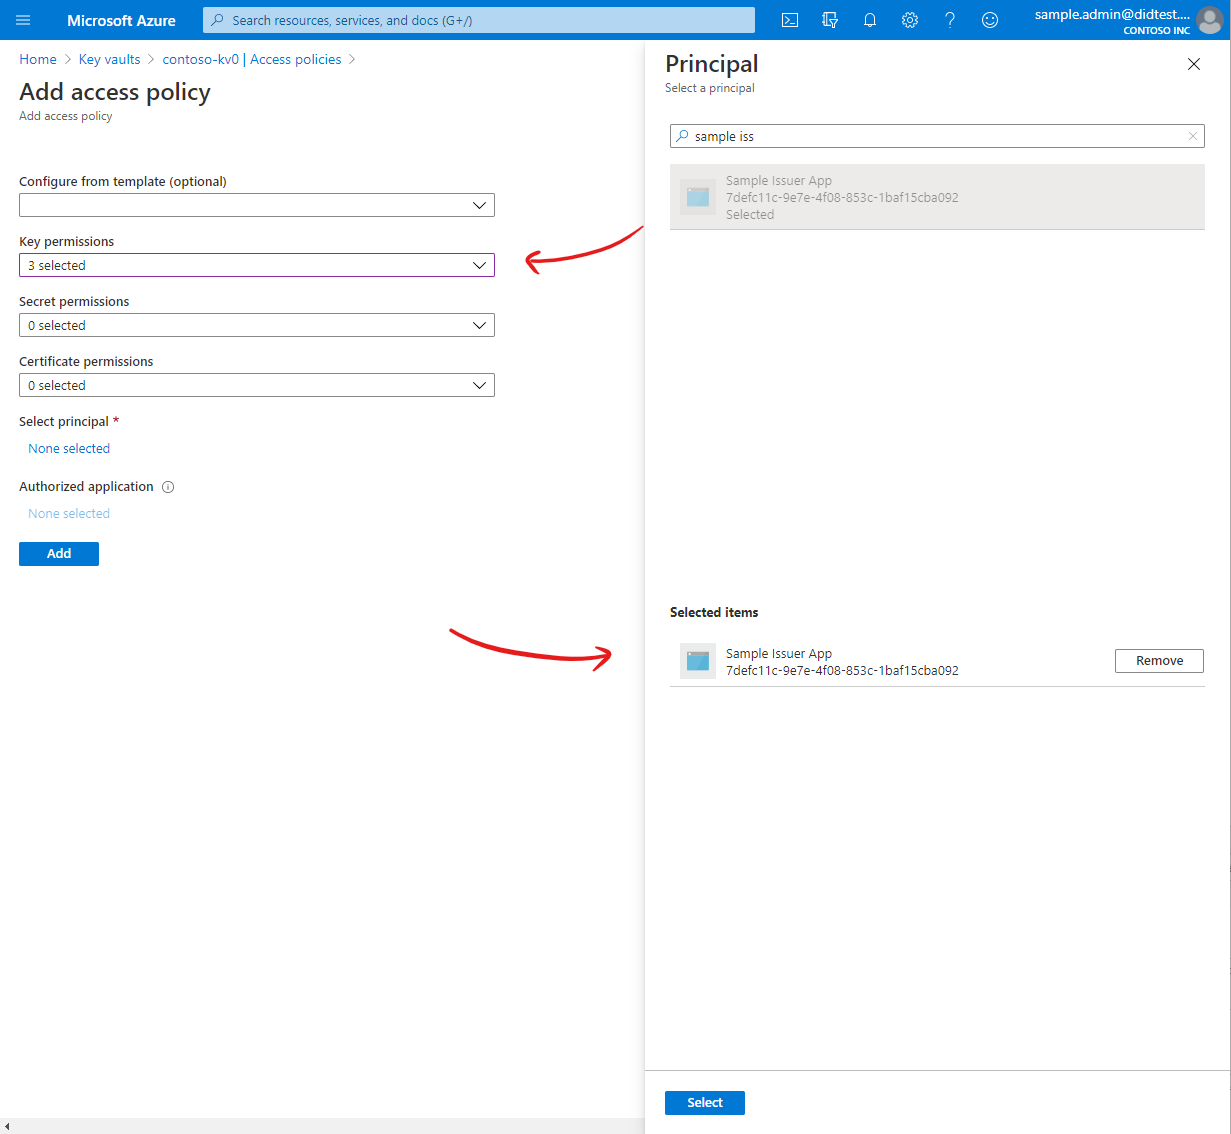
After creating your application in Azure AD, you need to grant the application permission to perform operations on your Key Vault. This enables the website to access and use the private keys that are stored in Key Vault.
| Detail | Required |
|---|---|
| Principal | Your Azure AD application, created above. |
| Permissions | At minimum, permit the Key Create, Key Get, and Key Sign operations. |
At this point you should have a Key Vault and an application with a client ID and client secret. Your application has been granted access to your Azure Key Vault.
Install the Verifiable Credentials SDK
During the Verifiable Credentials preview, you must issue credentials using the Verifiable Credentials NPM package. Source code for the Verifiable Credentials SDK can be found on GitHub.
npm install verifiablecredentials-verification-sdk-typescript@0.10.0-preview.29
npm install @azure/identity@1.1.0
Use the VC SDK
The VC SDK must be used in a NodeJS server. You can use the SDK to send a credential issuance request to Microsoft Authenticator by following the steps below:
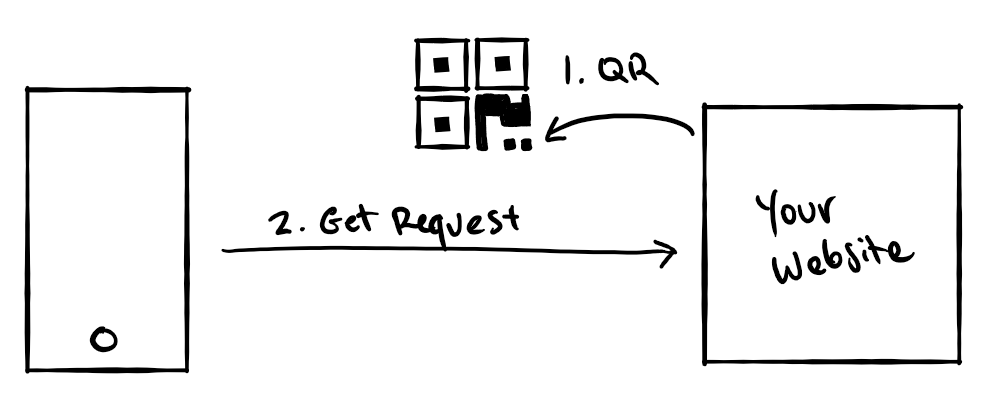
- Issuance requests are sent by displaying a QR code and/or a deep link, which the user can open using Microsoft Authenticator.
- When the QR code or deep link is opened, Authenticator will send an
HTTP GETrequest to your server to retrieve the details of an issuance request. This helps keep the size of the QR code relatively small so it can be easily scanned. - After retrieving an issuance request, Authenticator will execute an Verifiable Credential issuance process according to the rules described in your rules file. When credential issuance completes, Authenticator will receive and store the new verifiable credential.
The APIs used to implement each of these steps are described in the sections below.
Display a QR code and deep link
To initiate an issuance flow, you first need to display a QR code and/or a deep link on your website. On a desktop browser, the user can scan the QR code using Microsoft Authenticator to request a credential. On mobile, tapping a deep link will open Authenticator and initiate the request automatically.
openid://vc/?request_uri=https%3A%2F%2Fmyserver.com%2Fissue-request
| Parameter | Description |
|---|---|
request_uri |
A URL that points to your server, where an issuance request can be retrieved. The example given here is https://myserver.com/issue-request. |
You don't need the VC SDK to construct this string. Use an open source QR code generator to convert the request into a QR code. This can be done on the server or in client side using javascript in the browser.
Generate the issuance request
Authenticator sends an HTTP GET to the provided request_uri to retrieve the issuance request. Your server needs to respond with an issuance request as a JWT.
GET /issue-request HTTP/1.1
Host: www.myserver.com
Accept-Language: en-us
Connection: Keep-Alive

HTTP/1.1 200 OK
Content-Length: 88
Content-Type: application/jwt
Connection: Closed

eyJhbGciOiJSUzI1NiIsImtpZCI6IjFlOWdkazcifQ.ewogImlzcyI6ICJ...
To generate this response, you can use the VC SDK to construct a properly formatted issuance request. Follow the steps below to construct an issuance request in the JWT format.
var { ClientSecretCredential } = require('@azure/identity');
var { CryptoBuilder,
      LongFormDid,
      RequestorBuilder,
      KeyReference,
      KeyUse
    } = require('verifiablecredentials-verification-sdk-typescript');
// Provide authentication details for Azure Key Vault
const kvCredentials = new ClientSecretCredential('Azure Tenant Id', 'Client ID', 'Client Secret');

// Setup the website connection to Azure Key Vault
const signingKeyReference = new KeyReference('issuer-signing-key', 'key');
const recoveryKeyReference = new KeyReference('issuer-signing-key', 'key');
var crypto = new CryptoBuilder()
    .useSigningKeyReference(signingKeyReference)
    .useRecoveryKeyReference(recoveryKeyReference)
    .useKeyVault(kvCredentials, 'https://myvault.vault.azure.net/')
    .build();

// BUGBUG: This website current does not use the same issuer DID that was
// generated in Azure Portal. Instead, it generates a new set of keys
// in Key Vault and a new DID. This will be updated soon.
crypto = await crypto.generateKey(KeyUse.Signature, 'signing');
crypto = await crypto.generateKey(KeyUse.Signature, 'recovery');
const did = await new LongFormDid(crypto).serialize();
crypto.builder.useDid(did);
crypto object, you can create your issuance request using the RequestorBuilder API. When using this API, be sure to modify all values to reflect appropriate values for your Verifiable Credentials. In particular, be sure to modify the credentialType to the value you chose in your rules file, and the contracts value to the Issue credential URL for your credential.
const requestBuilder = new RequestorBuilder({
    presentationDefinition: {
      input_descriptors: [{
          schema: {
              uri: ['https://schemas.contoso.edu/credentials/schemas/diploma2020'],
          },
          issuance: [{
              manifest: 'https://portableidentitycards.azure-api.net/v1.0/9c59be8b-bd18-45d9-b9d9-082bc07c094f/portableIdentities/contracts/Diploma2020'
          }]
      }]
  }
}, crypto).allowIssuance();

var issueRequest = await requestBuilder.build().create();
var jwt = issueRequest.request;
| Parameter | Description |
|---|---|
crypto |
The crypto object created above. |
...schema.uri |
The type of your Verifiable Credential you are going to issue that you added to your rules file. |
...manifest |
The Issue credential URL for your credential, which you copied from the Azure Portal in previous steps. |
.allowIssuance() |
Include credential issuance requests. |
Once you've implemented the steps above, you're ready to issue yourself a Verifiable Credential. You are now well on your way to building a more trustworthy internet. Continue onto the next article to use Microsoft Authenticator to get your Verifiable Credential.
See something missing? We'd love your feedback and input on the Verifiable Credentials preview. Please contact us. When you use Microsoft DID Services, you agree to the DID Preview Agreement and the Microsoft Privacy Statement.